
The RH Manage Assignments component is where a project’s staffing plan takes shape. Add several assignments at once, set each one’s role and rate, name the people you already know, and give the assignment a baseline forecast, all inline on the record page and saved in one click.
The component works on RH Projects, Opportunities, Resources, and any other object configured for Resource Hero.

Create Assignments
- Open the record and select the Manage Assignments tab (or scroll to the component, depending on your page layout).
- Click the + icon at the top right of the component. A new row appears at the top of the list. Click it once for each assignment you want to add.
- Enter each assignment’s details, such as Resource, Role, and Rate.
- Click Save at the top right of the component. All new and changed rows save together.

To discard unsaved rows and changes, click the Cancel icon (✕) next to Save.
Plan a Role Before You Staff It
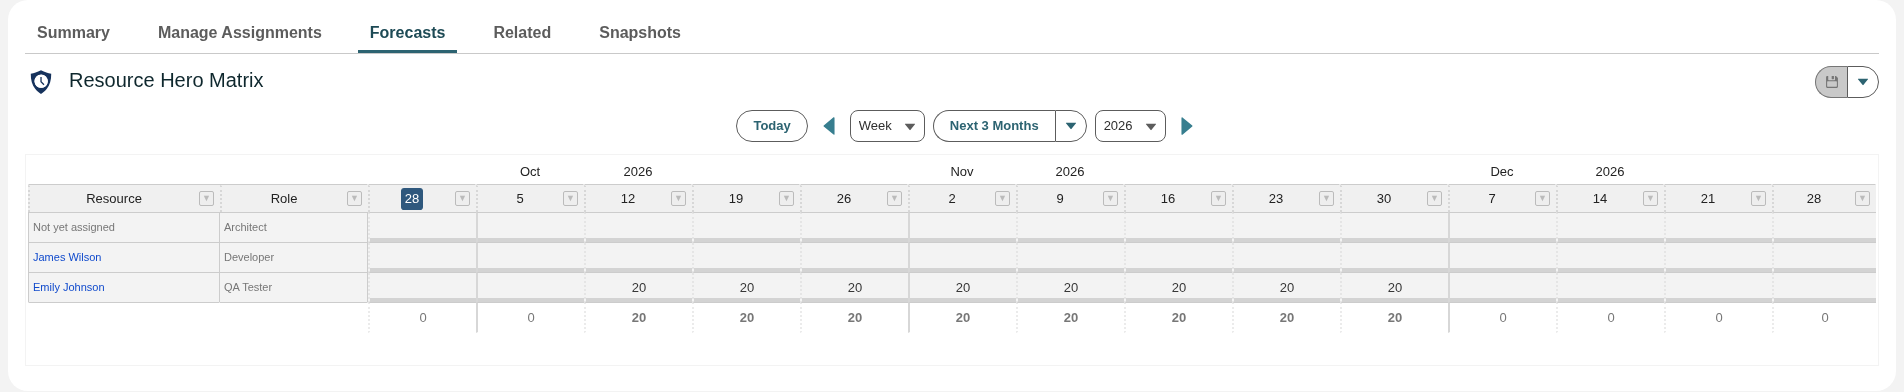
You don’t need to know who will fill a role to add it to the plan. Leave Resource blank, enter the Role and Rate, and save. The assignment is created and appears on the RH Matrix as “Not yet assigned” until you name the person. When you know who it is, select them in Resource and click Save.
Create a Baseline Forecast
If you already know roughly how many hours an assignment needs, the auto-forecast fields create its forecast for you when you save:
| Field | What to enter |
|---|---|
| Auto Forecast Hours | The number of hours, for example 4 |
| Forecast Mode | How those hours are spread: Per Day, Per Week, Per Week (Workday Spread), Per Month, Per Month (Workday Spread), or Total |
| Start Date / End Date | The date range the hours cover |
For example, 4 hours Per Day from Oct 12 through Dec 4 creates a forecast of 20 hours a week for that resource across the range. For exactly how each mode distributes hours, see Auto Forecasting.

Changing Auto Forecast Hours, Forecast Mode, Start Date, or End Date on an existing assignment overwrites its forecasts within the new date range. Select Overwrite All Existing Forecasts to replace forecasts outside the range as well.
After you save, select the Forecasts tab to see the result on the RH Matrix. The auto-forecast assignment already carries its hours, and assignments without a forecast are listed with no hours, ready to plan.
Find a Resource for an Open Role
Each saved row has a Find Resource icon (the person icon at the left of the row). Click it to compare available resources against the assignment’s dates and pick one. The icon is available once the row is saved and has no unsaved changes. See Find Resources.
Update Assignments
Edit any field directly in the row, then click Save.
Delete Assignments
- Click the trash icon on the row. The row turns gray to show it is pending delete.
- Click Save to delete it, or Cancel to keep it.

Required Permissions
| To | The user needs |
|---|---|
| Create assignments | Create on the Resource Assignment object, and Edit on the lookup field that links the assignment to the record (for example ResourceHeroApp__Opportunity__c on Opportunities, ResourceHeroApp__RH_Project__c on RH Projects) |
| Update assignments | Edit on the Resource Assignment object |
| Delete assignments | Delete on the Resource Assignment object |
| Use Find Resource | Edit on the Resource Assignment object and on its Resource field |
Add the Component to a Lightning Page
- Open a record of the object you want, click the gear icon, then click Edit Page to open the Lightning App Builder.
- In the Components list, find RH Manage Assignments under Custom – Managed (or search for it).
- Drag the component onto the page. It can go directly on the page or inside a Tabs or Accordion component, as on the standard RH Project page.
- Set the properties in the right-hand panel (see Configuration Options below).
- Click Save, and activate the page if prompted.
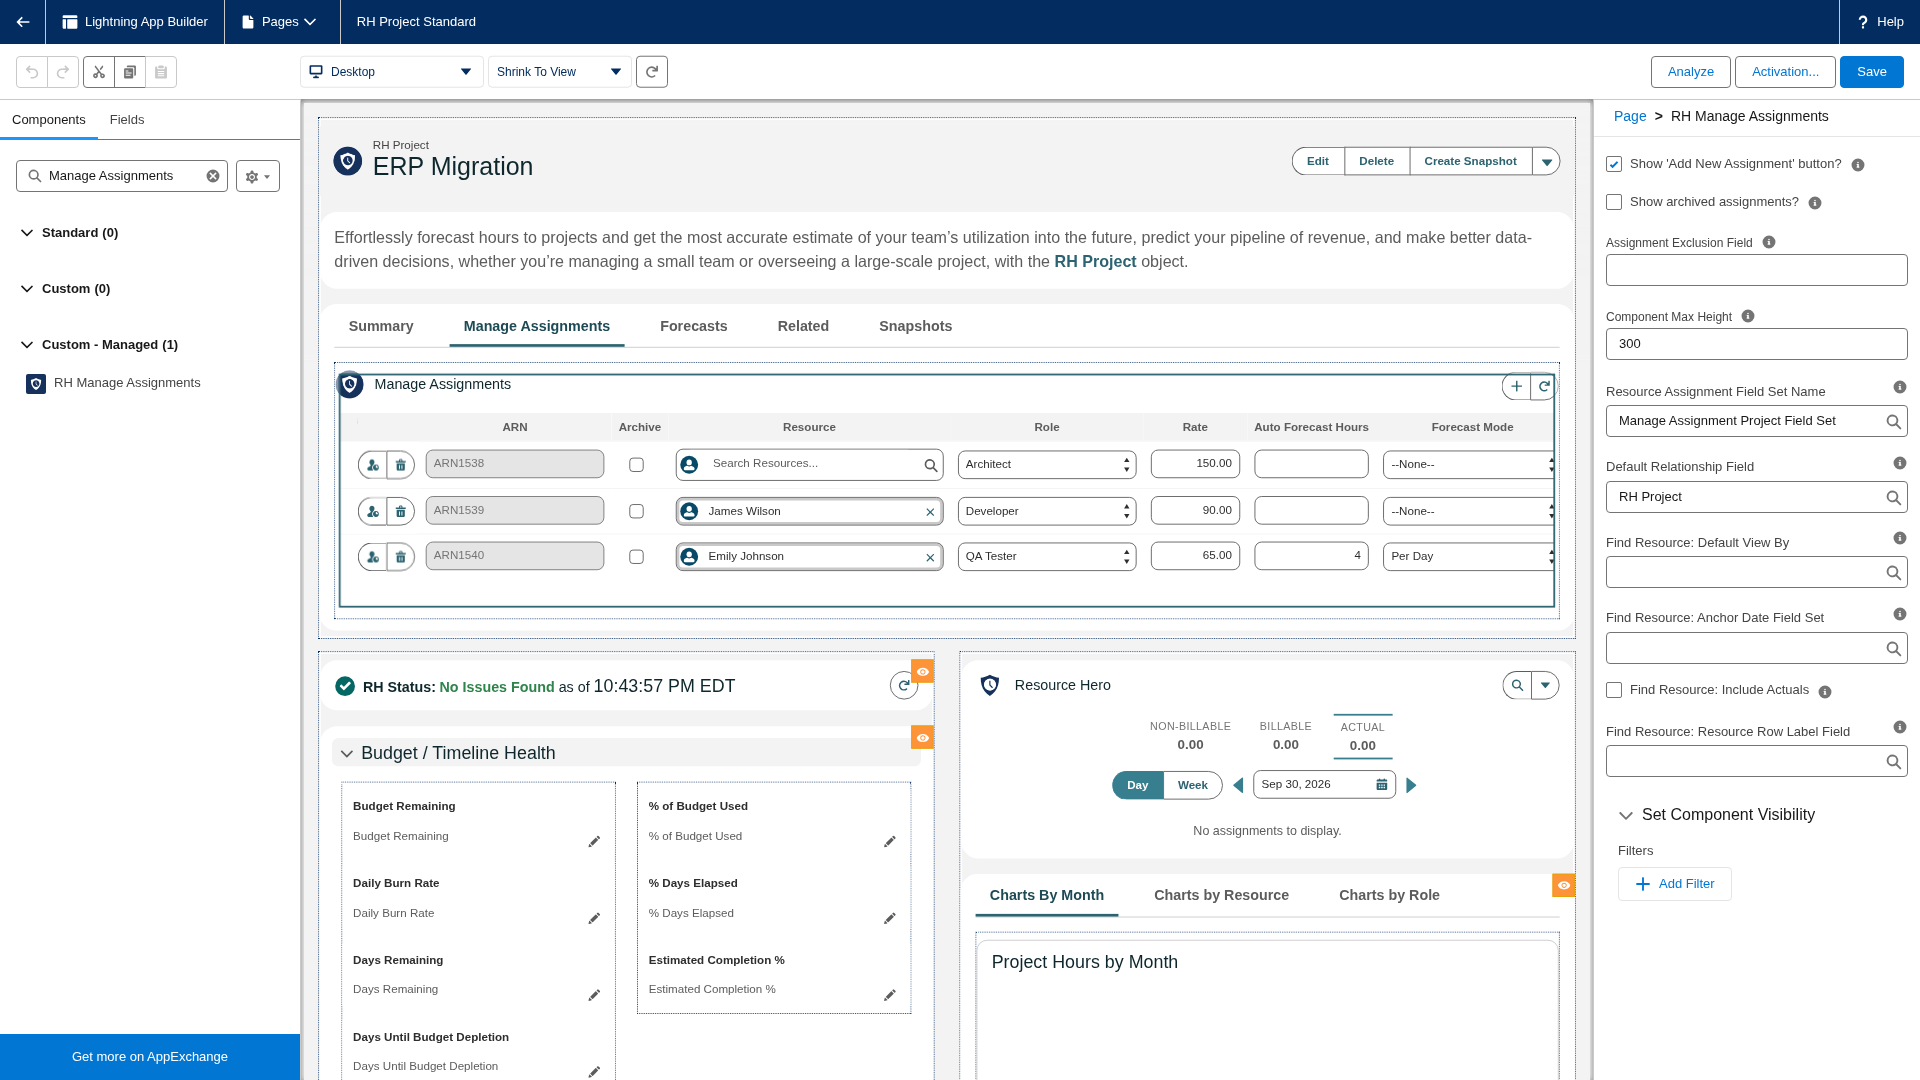
The component works on any object configured for Resource Hero. To use it on a custom object, first set up Resource Hero components on that object.
On a Resource record page, new assignments are created for that resource automatically, even when the Resource field isn’t shown in the component.
Configuration Options
| Name | Description | Available Values | Default |
|---|---|---|---|
| Show ‘Add New Assignment’ button? | Lets users create assignments from the component. | true, false | true |
| Show archived assignments? | Includes archived assignments in the list. Leave off on objects with many archived assignments, such as Resource. | true, false | false |
| Assignment Exclusion Field | A checkbox (or checkbox formula) Resource Assignment field. When set, only assignments where it is true are shown. See Assignment Exclusion Field. | Checkbox fields on Resource Assignment | None |
| Component Max Height | The height, in pixels, the component can grow to before it scrolls. | Integers greater than 100 | 300 |
| Resource Assignment Field Set Name | The field set that controls which columns appear. Resource Hero ships three: Manage Assignment Standard Field Set, Manage Assignment Project Field Set, and Manage Assignment Resource Field Set. See Adding Fields to the Manage Assignments Component. | Resource Assignment field sets | Manage Assignment Standard Field Set |
| Default Relationship Field | The lookup filled with the current record’s Id on new assignments. Useful when the relationship field isn’t shown in the component. The field must be configured (Opportunity is configured out of the box). | Resource Assignment lookup fields | None |
| Find Resource: Default View By | The view Find Resource opens in. | Day, Single Week, Week, Month | Week |
| Find Resource: Anchor Date Field Set | A Resource Assignment field set of date fields offered as anchor dates in Find Resource. The first field is the default. | Resource Assignment field sets | None |
| Find Resource: Include Actuals | Shows actual hours alongside forecast hours in Find Resource. | true, false | false |
| Find Resource: Resource Row Label Field | The Resource field shown as each row’s label in Find Resource. Point it at a text formula to combine values, such as name and team. | Resource fields | Name |

