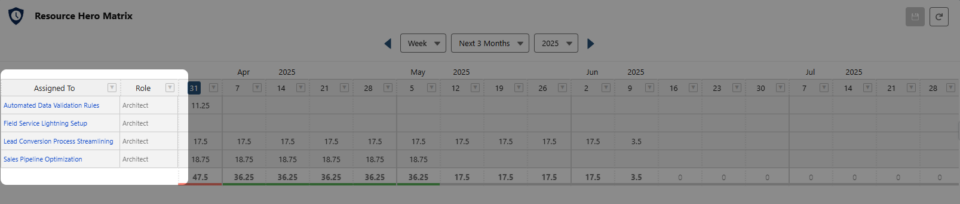
The RH Matrix gives you control over which fields display in the row header portion of the interface. By configuring a custom field set, you can tailor the data displayed to meet the needs of your specific use case.
This guide walks you through how to create a field set on the Resource Assignment object, add fields (including relationship fields), and understand how security impacts what your users see.
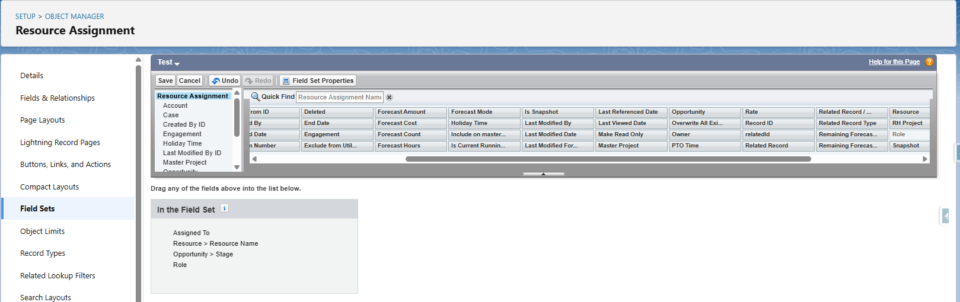
Step 1: Navigate to the Resource Assignment Object
- From Setup, go to Object Manager.
- Search for and select Resource Assignment.
- In the left-hand sidebar, click Field Sets.
- Click New to create a new field set.
Give your field set a meaningful label, name, and description. This label will not appear to end users, but it’s helpful to keep things organized, especially if you’re managing multiple matrix views.

Step 2: Add Fields to the Field Set
Drag and drop the fields you’d like to include from the top section into the field set area. These fields will be used as row headers in the RH Matrix when the component is added to a lightning page.
Some commonly used fields:
- Assigned To – Includes the name of the parent Opportunity, RH Project or other related record.
- Resource.Name – A reference to the related Resource record
- Role – The role this resource is playing on the assignment
⚠️ Important Note on Relationship Fields
If you want to display a field from a related object (e.g., the name of the Resource), do not select the lookup field directly from the Resource Assignment object. This will only return the record ID.
Instead, use the relationship selector on the left side of the field list:
- Expand the related object (e.g., Resource).
- Choose the specific field you want to display (e.g.,
Resource > Name).In this way, you can select the Name field or any other field from the relationship. For example, if you have a formula field on Resource that concatenates the Name field with the resource’s team in parenthesis, you could display this field.
Step 3: Save the Field Set
Once your fields are added and ordered to your liking, click Save. This custom field set is now ready to be referenced in the RH Matrix. For details, refer to the RH Matrix support page.
