In the v13 release, the Legacy Visualforce Matrix has been replaced with the more modern and feature-rich Matrix Lightning Web Component. If you have any questions or need assistance migrating to the new component, please contact us and we would be happy to help.
Follow the steps below when you need to create a custom matrix for a standard or custom object.
Create a new Visualforce Page
- From Setup, enter Visualforce Pages in the quick find search box, then click on the Visualforce Pages link when it is displayed.
- Click the New Button.
- Enter in a Label for the new page, for example, Project Forecast Matrix.
- By default, Salesforce will automatically enter the same name in the Name field. Edit the default to include underscore characters instead of spaces. For example: Project_Forecast_Matrix
- In the main Visualforce Markup section, copy and paste the following markup that we will modify:
<apex:page standardcontroller="[Object API Name]" id="ResourceHeroPage">
 <ResourceHeroApp:Matrix
 ActualOrForecast = "Forecast"
 ForceReadOnly = "False"
 PageURL = "/apex/c__[Page Name]"
 DefaultViewBy = "Week"
 DefaultTimeRange = "Next 3 Months"

 ViewUserAssignmentsOnly="false"
 StandaloneUserMatrix="false"
 AssignmentExclusionField=""


 MatrixHeight=""
 ManageAssignmentsButtonVisible="false"
 QuickAssignButtonVisible="false"
 ArchiveButtonVisible="true"
 NotesButtonVisible="true"
 FullScreenButtonVisible="true"
 SaveButtonVisible="true"
 NotesDefaultOpen="false"
 />
 </apex:page>
There are several sections of this code that we need to modify:
[Custom Object API Name] – Enter the API name of the object that you are setting up Resource Hero on. API names can be found on the object detail page in setup as mentioned above. If this matrix will be used on the Home tab or on a stand-alone lightning app page, the following should be removed from the template: standardcontroller=”[Object API Name]”
[PageURL] – This setting is used internally by resource hero for page navigation. It will always be the ‘/apex/c__’ as a prefix followed by the name of the page that you are creating.
Other Settings
ActualOrForecast – Determines what type of data you would like to have displayed in the matrix, Forecasts or Actuals.
- Forecast (default)
- Actual
ForceReadOnly – Change this setting only if you want to force all data displayed in the matrix to be read only.
DefaultViewBy – Determines how you would like the columns to display data in the matrix by default:
- Week (Default): each column in the matrix represents a single week.
- Day – each column represents a single day.
- Timetracking – same as the Day view, but shows only a week at a time and displays the notes section by default.
DefaultTimeRange – Determines the time range that is displayed in the matrix by default. If left blank, the Time Range will default to the current month (Day view), the current quarter (Week view), or the current year (Month view). A full list of available options can be found here: Legacy Visualforce Matrix: View and Time Range Options
MatrixHeight– Change this setting only if you want to force this matrix to be a different height than the global default.
ManageAssignmentsButtonVisible – Determines whether the Manage Assignments button is visible.
- true (default)
- false
QuickAssignButtonVisible – Determines whether the Quick Assign button is visible.
- true (default)
- false
ArchiveButtonVisible – Determines whether the Show / Hide Archive button is visible.
- true (default)
- false
NotesButtonVisible – Determines whether the Show / Hide Notes button is visible.
- true (default)
- false
FullScreenButtonVisible – Determines whether the Full Screen button is visible.
- true (default)
- false
SaveButtonVisible – Determines whether the Save button is visible.
- true (default)
- false
NotesDefaultOpen – Determines whether the Notes section is toggled open by default.
- true
- false (default)
StandaloneUserMatrix – Used in conjuntion with the View User Assignments Only setting to create stand alone matrices for the home tab, lightning apps, and communities.
- true
- false (default)
ViewUserAssignmentsOnly – Should the matrix display assignments only for the current running user
- true
- false (default)
AssignmentExclusionField – API name of a Resource Assignment field that can be used to exclude certain records from being displayed. The specified field can be either a checkbox field or a checkbox-based formula field. If no field is specified, all relevant assignments will be displayed. If a field is specified, only assignments where the field value is TRUE will be displayed and assignments where the field value is FALSE will not be displayed. Additional details can be found here: Assignment Exclusion Field
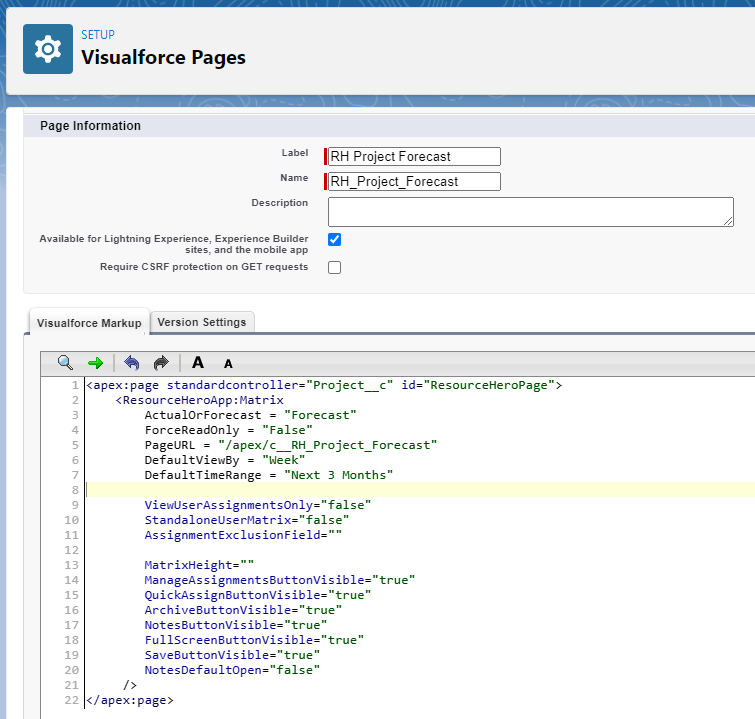
Example
As an example, a forecasting matrix on the Project object showing a view of the Next 3 Months:
Note: After saving the Visualforce page, access will be granted to the System Administrator profile. Additional access can be granted to the page by profile or permission set: Visualforce Page Security.
