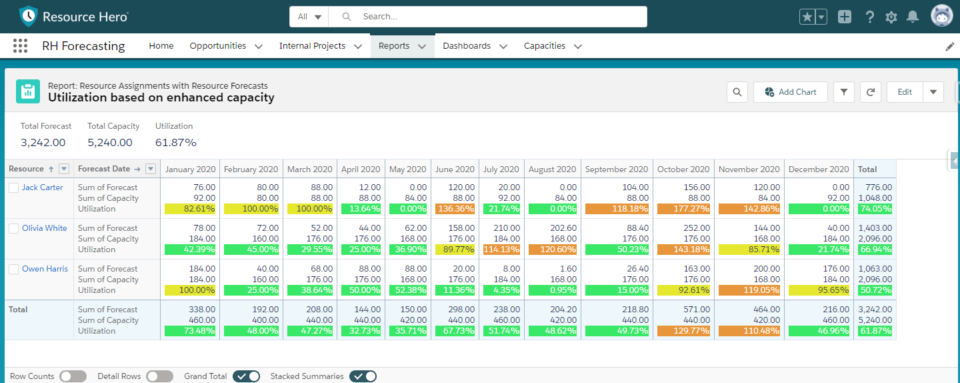
While Resource Hero can support Utilization reports out of the box, some organizations need a more dynamic way to keep track of resource capacity that may change day-to-day or week-to-week. The following instructions will walk you through how to configure enhanced capacity.
Create new Capacity object
- In Object Manager, select “New Custom Object”.
- Label- “Capacity”.
- Select “Allow Reports”.
- Select “Launch New Custom Tab Wizard…”.
- Save.
Create a new lookup field to your Capacity object
- From Object Manager, enter “Resource Assignment” in the Quick Find, and click on the “Resource Assignment” object.
- Select “Fields and Relationships” from the menu on the left, then click the “New” button.
- Select “Lookup Relationship” as the Field Type, and then click Next.
- In the Related To dropdown, select “Capacity”. Click Next.
- Field Label and Field Name will be “Capacity”. Write this down, as you will need it later. Select the “Don’t allow deletion of the lookup record…” radio button. Click Next.
- Review Field Level Security Settings, click Next.
- Review Page Layout Settings, click Next.
- Review Related List settings, click Save.
Add RHA Object Translation custom setting entry
- From Setup, enter “Custom Settings” in the Quick Find.
- Click on “Manage” on “RH Object Translation”.
- Click “New”.
- In “Name” field, enter “Capacity__c”.( Leave the Name Field and Namespace blank)
- In “Object Name” field, enter “Capacity__c”.
- Save.
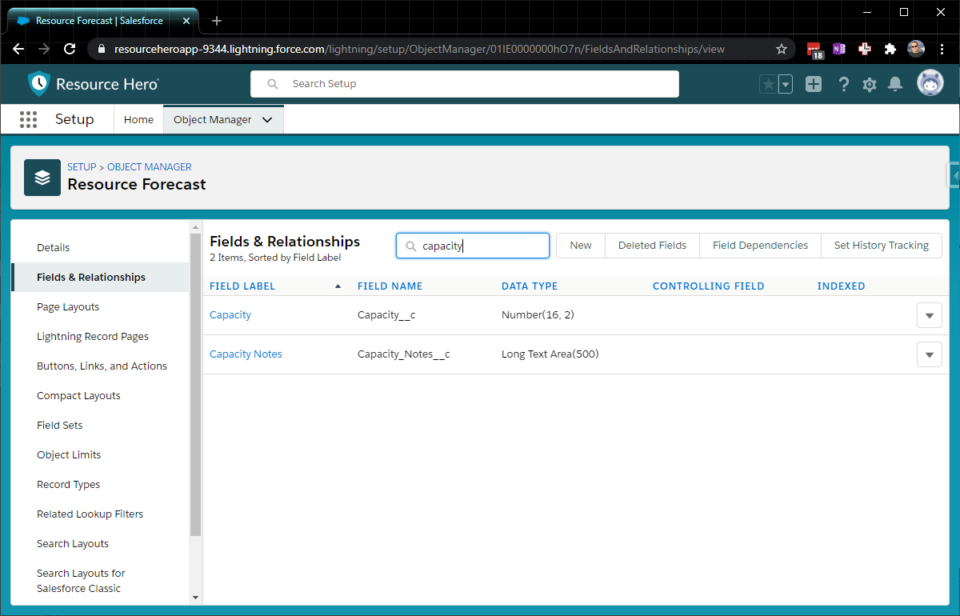
Create needed Capacity fields on the Resource Forecast object
- From Object Manager, select “Resource Forecast”.
- Click on Fields and Relationships, and select “New”..
- Field Type, select “Number”. Click Next.
- Field Label should be “Capacity”
- Field length should be “5”, with Two decimal places. Click Next.
- Review Field-Level Security. Click Next.
- Add to Resource Forecast Layout.
- Click Save & New.
- Select “Text Area (Long)”. Click Next.
- Field Label is “Capacity Notes”.
- Length is “500”. Click Next.
- Review Field-level Security. Click Next.
- Save.
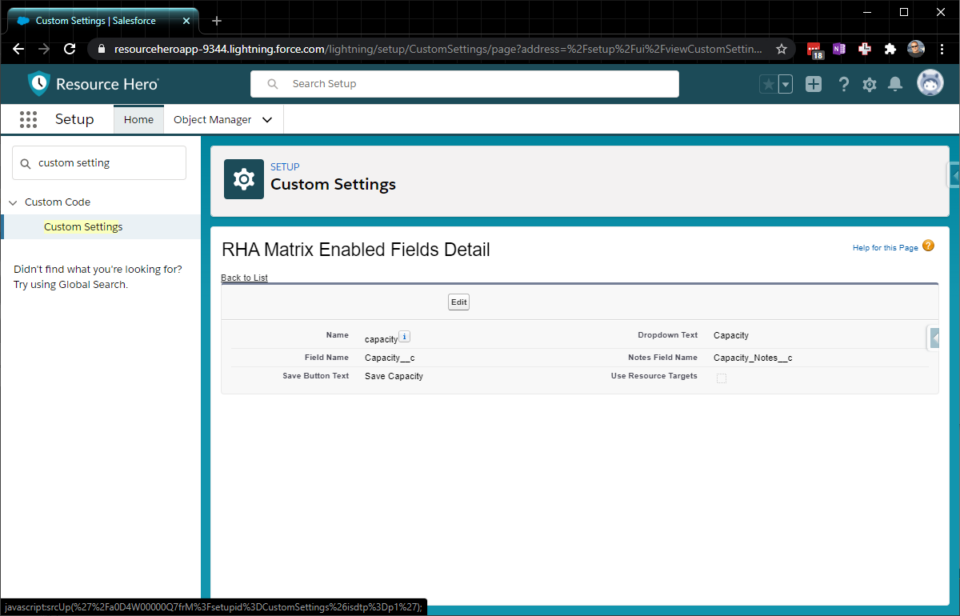
Create RHA Matrix Enabled Fields custom setting entry
- From Setup, enter “Custom Settings” in the Quick Find Search.
- Click “Manage” next to the “RHA Matrix Enabled Fields” custom setting.
- Click “New”.
- Enter the following:
- Name: “Capacity”
- Dropdown Text: “Capacity”
- Field Name: “Capacity__c”
- Notes Field Name: “Capacity_Notes__c”
- Save Button Text: “Save Capacity”
- Uncheck box stating “Use Resource Targets”.
- Save
Create the Visualforce Page
- From Setup, enter Visualforce Pages in the Quick Find search and click on the “Visualforce Pages” link.
- Click “New”.
- Label is “RH Capacity”.
- Name is “RH_Capacity”.
- Select checkbox “Available for Lightning Experience…”
- Copy and Paste the following into the Visualforce Markup:
<apex:page standardcontroller="Capacity__c" id="ResourceHeroPage">
     <ResourceHeroApp:Matrix ActualOrForecast="capacity"
         ForceReadOnly="False"
         PageURL="/apex/c__RH_Capacity"
         DefaultViewBy="Week"
         DefaultTimeRange=""

         MatrixHeight=""
         ManageAssignmentsButtonVisible="false"
         QuickAssignButtonVisible="false"
         ArchiveButtonVisible="true"
        NotesButtonVisible="true"
         FullScreenButtonVisible="true"
         SaveButtonVisible="true"
         NotesDefaultOpen="false"
      />
</apex:page>- Save.
Add the new Visualforce Page to your Capacity Object lightning page
- From the Capacity object in the UI, create a new test capacity record.
- From the gear icon, click Edit Page.
- Label the new page “RH Capacity”, or a label of your choosing.
- Drag a Visualforce component to the layout.
- Select “RH Capacity”
- Change the height setting to 350px. Click OK.
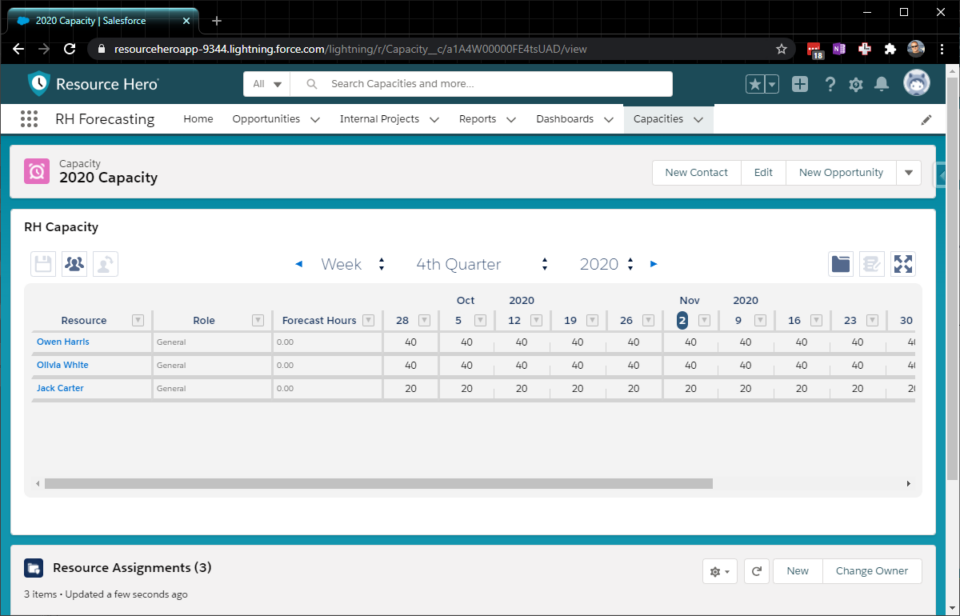
- Add RH Manage Assignments Lightning Component to the page.
- Save.
